Tie Tips
There are a number of different knots used to tie men’s ties – which to choose depends on a couple of factors, these are the spread (or width) of your collar points, and how long or short your neck is. The traditional knots are the Windsor knot, the Half-Windsor knot and the Four-in-Hand.
How do you know which to use? The Windsor knot is a large triangular knot used for a wide-spread collar as it takes up the space between the collar points. It’s a formal knot with impact and is great when you want to make a statement, such as formal presentations and interviews. It’s best for the normal to longer necked man.
The Half-Windsor is a smaller version of the Windsor and works with all but the most narrow of collar spreads. It is also more flattering for the shorter-necked man as it doesn’t take up as much room. It’s also the most common day-to-day knot to use.
The Four-in-Hand is a slightly asymmetrical and narrow knot and is used for very narrow collar spreads (such as the button-down collar), or for ties made of thick fabric.
Whatever know you choose remember that the wide end of your tie should end between the top and bottom of your belt buckle, that pulling the knot too tight will create creasing in the tie, and that at the end of each day your tie should be taken off, the knot undone (in a reversal of the tying process), and preferably rolled around your hand then placed flat to increase its life (this will help to iron out the little creases that knotting it makes).
The quality of the tie is also important in the overall look. Only buy ties made of 100% silk, and look at the construction – a well made tie will have a slip-stitch – a little piece of thread at the back of the wide end of the tie that holds it together – this should never be cut off or your tie will unravel. When buying a tie, hold the tie up from the tail (or narrow end) and see how straight it hangs. If it twists when new, it’ll twist even more when worn and your tie won’t hang correctly.
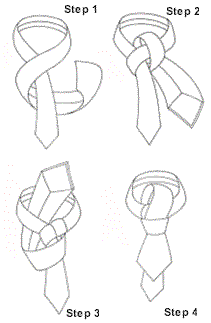
How to Tie a Half Windsor
1. Turn up your collar and drape the tie around your neck, the narrow ends tip should sit around the 4th button down your shirt, just above the navel (but this is proportionate to the length of your body and the length of the tie). Holding the narrow end in your non-dominant hand for stability, cross the wide end over the narrow end, go behind the narrow end and bring it back round to the front
2. Take the wide end up to the front of the loop, take through and out the same side it went up on.
3. Take the wide end over the narrow end and thread it up through the loop from the back of the loop.
4. Bring the wide end of the tie and thread it through the knot in front, and with both hands, one hand holding the narrow end the other sliding the knot carefully up the narrow end so it sits at the top of your collar (over the top button).
If your tie is too long or short, undo the tie and move the tie fractionally (a couple of centimetres only) one way or the other and try again – you’ll soon learn your ideal distance between the ends before you start tying.
© Imogen Lamport 2010
Reprint This Article
If you would like to reprint this article, please feel free ensuring you credit Imogen Lamport as author, include my webs address www.bespokeimage.com.au and email to let me know where you are publishing it.


